Spring Cloud 概述
SpringCloud 是什么
SpringCloud是分布式微服务架构下的一站式解决方案,越来的越多的企业在开发过程中从单一系统过度到多个微小系统,即微服务。微服务技术越来越火爆,通过将单一系统拆分成多个较小的专业的服务,可以达到与其他系统解耦,维护更加方便,构建高可用服务。SpringCloud基于SpringBoot提供了一套微服务解决方案,包括服务注册与发现,配置中心,全链路监控,服务网关,负载均衡,熔断器等组件等。相比于Dubbo分布式架构SpringCloud支持更多的组件来构建分布式微服务。
SpringCloud 架构图
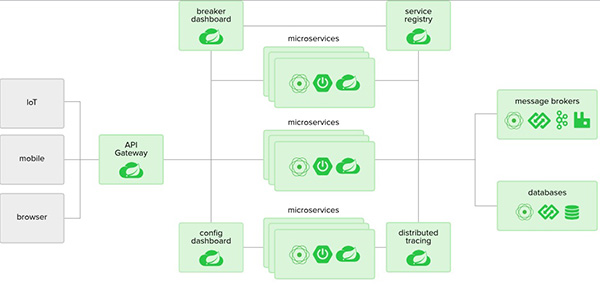
SpringCloud 主要子项目
- Spring Cloud Config--由git存储库支持的集中式外部配置管理。配置资源直接映射到Spring Environment,但是如果需要,可以由非Spring应用程序使用。
- Spring Cloud Netflix--与各种Netflix OSS组件(Eureka,Hystrix,Zuul,Archaius等)集成。
- Spring Cloud Bus--事件总线,用于将服务和服务实例与分布式消息传递链接在一起。对于在群集中传播状态更改(例如配置更改事件)很有用。
- Spring Cloud Cloudfoundry--将您的应用程序与Pivotal Cloud Foundry集成。提供服务发现实现,还可以轻松实现受SSO和OAuth2保护的资源。
- Spring Cloud Open Service Broker--为构建实现Open Service Broker API的服务代理提供起点。
- Spring Cloud Cluster--集群,Zookeeper,Redis,Hazelcast,Consul的领导选举和常见状态模式以及抽象和实现。
- Spring Cloud Consul--使用Hashicorp Consul进行服务发现和配置管理。
- Spring Cloud Security--为Zuul代理中的负载平衡的OAuth2其余客户端和身份验证标头中继提供支持。
- Spring Cloud Sleuth--用于Spring Cloud应用程序的分布式跟踪,与Zipkin,HTrace和基于日志的(例如ELK)跟踪兼容。
- Spring Cloud Data Flow--针对现代运行时可组合微服务应用程序的云原生编排服务。易于使用的DSL,拖放式GUI和REST-API共同简化了基于微服务的数据管道的总体编排。
- Spring Cloud Stream--轻量级的事件驱动微服务框架,用于快速构建可以连接到外部系统的应用程序。在Spring Boot应用程序之间使用Apache Kafka或RabbitMQ发送和接收消息的简单声明性模型。
- Spring Cloud Stream Applications--Spring Cloud Stream应用程序是开箱即用的Spring Boot应用程序,使用Spring Cloud Stream中的绑定程序抽象提供与外部中间件系统(例如Apache Kafka,RabbitMQ等)的集成。
- Spring Cloud Task--一个短暂的微服务框架,可快速构建执行有限数量数据处理的应用程序。用于向Spring Boot应用程序添加功能和非功能功能的简单声明。
- Spring Cloud Task App Starters--Spring Cloud Task App Starters是Spring Boot应用程序,可以是任何进程,包括不会永远运行的Spring Batch作业,它们在有限的数据处理周期后结束/停止。
- Spring Cloud Zookeeper--使用Apache Zookeeper进行服务发现和配置管理。
- Spring Cloud Connectors--使各种平台上的PaaS应用程序轻松连接到后端服务,例如数据库和消息代理(该项目以前称为“ Spring Cloud”)。
- Spring Cloud Starters--Spring Boot风格的启动程序项目可简化Spring Cloud使用者的依赖关系管理。 (在Angel.SR2之后停产,并与其他项目合并。)
- Spring Cloud CLI--Spring Boot CLI插件,用于在Groovy中快速创建Spring Cloud组件应用程序。
- Spring Cloud Contract--Spring Cloud Contract是一个涵盖项目的总体解决方案,可帮助用户成功实施“消费者驱动合同”方法。
- Spring Cloud Gateway--网关,Spring Cloud Gateway是基于Project Reactor的智能可编程路由器。
- Spring Cloud OpenFeign--Spring Cloud OpenFeign通过自动配置并绑定到Spring Environment和其他Spring编程模型习惯用法,为Spring Boot应用程序提供集成。
- Spring Cloud Pipelines--Spring Cloud Pipelines提供了一个可靠的部署管道,其中包含一些步骤,以确保您的应用程序可以零停机时间进行部署,并且可以轻松回滚某些错误。
- Spring Cloud Function--Spring Cloud Function通过功能促进业务逻辑的实现。它支持跨无服务器提供程序的统一编程模型,以及独立运行(本地或在PaaS中)的功能。
可以看到springcloud生态圈包含诸多的子项目。
SpringCloud 版本管理
spring cloud 的版本管理比较特殊,不是我们常见项目版本,如 Hoxton,Greenwich,Finchley,后面在加.SR10这样的字母符号才是Spring Cloud的版本,前面的Hoxton这些是伦敦地铁站的名字, 为什么要采用这样的版本管理呢,可能是Spring Cloud生态圈下有诸多的子项目,而这些项目都有自己的版本好,为了不予Spring Cloud的大版本混淆。也可能有其他的原因。
SpringCloud入门搭建
环境搭建
这里使用idea, gradle常见spring cloud 工程。
首先在idea中创建一个Gradle的空项目,作为父工程。

创建完项目后我们修改build.gradle配置文件,设置Springboot,SpringCloud版本,公用属性
buildscript {
    ext {
        springBootVersion = '2.3.7.RELEASE'
        springBootManagementVersion = '1.0.10.RELEASE'
        springCloudVersion = 'Hoxton.SR10'
    }
    repositories {
        mavenLocal() //1.优先查找本地maven库,性能最好
        maven { url 'http://maven.aliyun.com/nexus/content/groups/public' }
        mavenCentral()//3.最后查找maven中央库
    }
    dependencies {
        classpath("org.springframework.boot:spring-boot-gradle-plugin:${springBootVersion}")
        classpath("io.spring.gradle:dependency-management-plugin:${springBootManagementVersion}")
    }
}

allprojects {
    group "com.zlennon"
    version "1.0.0"
}

subprojects {
    apply plugin: 'java'
    apply plugin: 'application'
    apply plugin: 'org.springframework.boot'
    apply plugin: 'io.spring.dependency-management'
    sourceCompatibility = JavaVersion.VERSION_11
    targetCompatibility = JavaVersion.VERSION_11

    repositories {
        mavenLocal() //1.优先查找本地maven库,性能最好
        maven { url 'http://maven.aliyun.com/nexus/content/groups/public' }
        mavenCentral()//3.最后查找maven中央库
    }
    dependencies {
        testCompile(
                "org.springframework:spring-test",
                "junit:junit:4.12"
        )
    }
    dependencyManagement {
        imports { mavenBom("org.springframework.boot:spring-boot-dependencies:${springBootVersion}") }
        imports { mavenBom "org.springframework.cloud:spring-cloud-dependencies:${springCloudVersion}" }
    }
}
完成之后我们可以执行gradle build 或在idea中执行构建。
既然是微服务,我们先创建一个简单的服务提供这和服务消费者。在父项目下创建模块covid-provider和covid-cosumer
.png)
将这两个模块加入到父工程当中
rootProject.name = 'springcloud'
include ':covid-consumer'
include ':covid-provider'
修改各个模块的application.yml配置文件
//消费者
server:
  port: 8081
  servlet:
    context-path: /
api:
  url:
    prefix : http://localhost:8080/api/covid/


//提供者
server:
  port: 8080
  servlet:
    context-path: /
  error:
    whitelabel:
      enabled : false

spring:
  application:
    name: ms-covid-provider-8080
  datasource:
    url: jdbc:mysql://127.0.0.1:3306/springcloud?serverTimezone=UTC&useSSL=false
    username: root
    password: 123456
  jpa:
    hibernate:
      naming:
        physical-strategy: org.hibernate.boot.model.naming.PhysicalNamingStrategyStandardImpl
服务提供放创建响应的module,,service,repository,api访问接口供消费者调用
@RestController
@RequestMapping("/api/covid")
public class CovidController {

    @Autowired
    CovidService covidService;

   @GetMapping("/findAll")
    private List<Covid> findAll(){
        return  covidService.findAll();
    }

    @PostMapping("/saveDailyData")
    private void saveDailyData(){
       covidService.saveDailyData();
    }
}
消费者方
@RestController
@RequestMapping("/covid")
public class CovidController {

    @Autowired
    CovidService covidService;
    @Autowired
    RestTemplate restTemplate;
    @Value("${api.url.prefix}")
    String apiUrl;

   @GetMapping("/findAll")
    private List<Covid> findAll(){
       return Arrays.asList(restTemplate.getForObject(apiUrl+"findAll",Covid[].class)) ;
    }

    @PostMapping("/saveDailyData")
    private void saveDailyData(){
        restTemplate.postForEntity(apiUrl+"saveDailyData",null,String.class);
    }
}
启动两个springboot,使用消费者服务连接访问http://localhost:8080/covid/findAll。有了服务提供者我们就可以直接调用服务了,但是如果服务非常多的化,很难记住每个服务的ip和端口,也不知道每个服务是干什么的。这个时候就需要将服务统一注册管理,接下来将服务注册到Enreka服务注册中心。
服务注册
新创建服务注册模块 server-registry
导入依赖包 ` implementation 'org.springframework.cloud:spring-cloud-starter-netflix-eureka-server'`
配置Eureka服务注册中心
server:
  port: 9001
eureka:
  instance:
    hostname: localhost
  client:
    register-with-eureka: false
    fetch-registry: false
    service-url:
      defaultZone: http://${eureka.instance.hostname}:${server.port}/eureka/
启动应用,访问http://localhost:9001/ ,看如如下界面Eureka已配置正确
.png)
将服务提供者注册到Eureka
引入依赖compile('org.springframework.cloud:spring-cloud-starter-netflix-eureka-client')
在启动类加注解
eureka:
  client: #客户端注册进eureka服务列表内
    service-url:
      defaultZone: http://localhost:9001/eureka/
  instance:
    instance-id: ms-cloud-covid-8080
    prefer-ip-address: true     #访问路径可以显示IP地址
在消费者方配置
eureka:
  client:
    register-with-eureka: false
    service-url:
      defaultZone: http://localhost:9001/eureka/
当我们再次访问Eureka时,就会发现已注册的服务实例
.png)
使用Consul作为注册中心
需要的依赖implementation 'org.springframework.cloud:spring-cloud-starter-consul-discovery'
spring:
  cloud:
    consul:
      host: localhost
      port: 8500
      discovery:
        service-name: ms-covid-provider-consul
启动注解类@EnableDiscoveryClient
既然服务已经注册到Eureka,就需要到服务中心去找对应的服务,怎么找到对应的服务呢,这个时候就需要Ribbon或Feign 闪亮登场了,Ribbon是一个客户端的负载均衡组件,Feign是一个声明式WebService客户端.
负载均衡查找服务
- ribbon
引入ribbon依赖
implementation 'org.springframework.cloud:spring-cloud-starter-netflix-ribbon'
由于掉远程服务使用的是rest 所以我们在RestTemplate加上配置,@LoadBalanced 通过负载均衡查找服务
    @Bean
    @LoadBalanced
    public RestTemplate getRestTemplate() {
        return new RestTemplate();
    }
将客户端调用的的服务连接改为Eureka中的服务连接
http://ms-covid-provider-8080/api/covid/
将客户端标记为RibbonClient
@RibbonClient("ms-covid-consumer-8081")
-
Feign
依赖 implementation 'org.springframework.cloud:spring-cloud-starter-openfeign'
申明接口
@RestController
@RequestMapping("/covid")
public class CovidController {

    @Autowired
    FeignClientService feignClientService;

   @GetMapping("/findAll")
    private List<Covid> findAll(){
       return feignClientService.findAll() ;
    }

    @PostMapping("/saveDailyData")
    private void saveDailyData(){
        feignClientService.saveDailyData();
    }
}


---------------------------------------------------------------------


@FeignClient(value = "ms-covid-provider-8080",path = "/api/covid")
public interface FeignClientService {

    @RequestMapping("/findAll")
    public List<Covid> findAll();

    @RequestMapping("/saveDailyData")
    public void saveDailyData();
}
启动类标记客户端@EnableFeignClients()。
Spring Cloud Hystrix熔断
在分布式系统中服务之间会存在级联调用,加入其中某些服务异常,将会使一条线上的调用超时或失败,进而可能造成请求的大量堆积。Hystrix通过添加延迟,容错,提供备选项 可以提高系统的整体弹性。
引入依赖 implementation 'org.springframework.cloud:spring-cloud-starter-netflix-hystrix'
配置文件中 开启熔断
feign:
  hystrix:
    enabled: true
在主启动类添加 @EnableHystrix或@EnableCircuitBreaker注解
- 使用@HystrixCommand
HystrixCommand 方式很简单,@HystrixCommand(fallbackMethod = "findCovidFail") ,添加注解并设置调用异常时的处理方法。若果方法较多的话这多处理方法非常繁琐。
-
使用fallbackFactory
feigin申明式调用
@FeignClient(value = "ms-covid-provider-8080",path = "/api/covid",fallbackFactory=CovidFallbackFactory.class)
public interface FeignClientService {

	@RequestMapping("/findAll")
	public List<Covid> findAll();

	@RequestMapping("/findById/{id}")
	public Covid findById(@PathVariable(value="id") Integer id);
}
失败回调工厂
@Component
public class CovidFallbackFactory implements FallbackFactory<FeignClientService> {
    Logger logger = LoggerFactory.getLogger(getClass());
    @Override
    public FeignClientService create(Throwable cause) {
        return new FeignClientService() {
            @Override
            public List<Covid> findAll() {
                return Collections.emptyList();
            }

            @Override
            public Covid findById(Integer id) {
                logger.error(cause.toString());
                return new Covid();
            }

        };
    }
}
完成配置后我们启动服务测试,根据id查找不到数据的会抛异常,进而会调用我们出错情况下的处理方法。
Spring Cloud 网关
微服务部署以后,当请求当来后就可以提供服务了,但是这些请求中可能包含不正常的请求,或者请求不能找到正确的服务,就像每个组织机构一样,都会设置一个前台接待客人,前台人员可以带着你找到你组织其他部门不至于迷路。spring cloud gateway为我们提供了这样一套机制,实现请求的路由,转发,校验等。
创建一个spring boot gateway模块
引入依赖
implementation 'org.springframework.cloud:spring-cloud-starter-gateway'
compile('org.springframework.cloud:spring-cloud-starter-netflix-eureka-client')
修改
server:
  port: 7002


spring:
  application:
    name: covid-gateway
  cloud:
    gateway:
      discovery:
        locator:
          enabled: true
      routes:
        - id:  covid-route #注意id前面的-需要
          uri: http://localhost:8080
          predicates:
            - Path=/api/covid/**
启动服务提供者8080,gateway 测试访问 http://localhost:7002/api/covid/findAll,可以访问,说明在访问/api/covid/**这样的路径是请求将被转发到8080上。
因为我们的服务都已经注册到了Eureka,那么就需要gateway到Eureka上找到请求对应的服务。 所以呢gateway应用也注册到Eureka中,这样gateway就能找到Eureka中的其他服务了。
完整的配置文件,同时启动类要标记为@EnableEurekaClient
server:
  port: 7002


spring:
  application:
    name: covid-gateway
  cloud:
    gateway:
      discovery:
        locator:
          enabled: true
      routes:
        - id:  covid-route
          uri: lb://ms-covid-provider-8080
          predicates:
            - Path=/api/covid/**

eureka:
  client: #客户端注册进eureka服务列表内
    service-url:
      defaultZone: http://localhost:9001/eureka/
  instance:
    instance-id: ms-cloud-gateway
    prefer-ip-address: true     #访问路径可以显示IP地址
访问http://localhost:7002/api/covid/findAll能够成功。
后台打印如下语句
DynamicServerListLoadBalancer : DynamicServerListLoadBalancer for client ms-covid-provider-8080 initialized: DynamicServerListLoadBalancer:{NFLoadBalancer:name=ms-covid-provider-8080,current list of Servers=[192.168.3.4:8080],Load balancer stats=Zone stats: {defaultzone=[Zone:defaultzone; Instance count:1; Active connections count: 0; Circuit breaker tripped count: 0; Active connections per server: 0.0;]
说明通过负载均衡找到了配置的服务。好了我们最简单的微服务已经配置好了,准备部署上线了,但是可能代码中只配置了开发环境的配置,生产环境有一些密码什么的不希望让开发人员看到,如果要让运维人员手动去改,少了还好,几百个微服务就麻烦了,能把运维人员给累死。并且开发的过程想要修改配置文件需要重启应用。这个时候就需要SpringCould的分布式配置中心了。
Spring Cloud Config 分布式配置中心
Spring Cloud Config是通过git 管理的,所以我们需要在Github一个仓库存放配置信息。仓库创建好了之后,需要创建一个Spring Cloud 配置服务,用来连接github访问上面的配置信息。
导入需要的包
implementation 'org.springframework.cloud:spring-cloud-starter-netflix-eureka-server'
配置git仓库信息 ,包含如下文件

server:
  port: 7003

spring:
  application:
    name: cloud-config-server
  cloud:
    config:
      server:
        git:
          uri: https://github.com/lennonn/spring-cloud-config
          search-paths: /
使用@EnableConfigServer开启配置服务,启动访问我们的配置信息 http://localhost:7003/application-providerconfig.yml ,能访问到说明配置正确。
客户端需要获取配置中心的文件访问,所以需要配置客户端以找到配置文件,需要创建一个bootstrap.yml,并且需要引入依赖
implementation 'org.springframework.cloud:spring-cloud-starter-config'
spring:
  cloud:
    config:
      name: application-providerconfig #需要从github上读取的资源名称,注意没有yml后缀名
      profile: dev   #本次访问的配置项
      label: master
      uri: http://localhost:7003
上面的配置说明我们的客户端去配置中心(http://localhost:7003)找一个文件名叫application-providerconfig.yml的文件
开启客户端,下面的输出证明已经拿到配置文件
09:42:19.682 [main] INFO  org.springframework.cloud.config.client.ConfigServicePropertySourceLocator.getRemoteEnvironment - Fetching config from server at : http://localhost:7003
09:42:22.536 [main] INFO  org.springframework.cloud.config.client.ConfigServicePropertySourceLocator.log - Located environment: name=application-providerconfig, profiles=[dev], label=master, version=40a4c183499f7a1ddf76ffb4758c1d33be5775e7, state=null
总结
在上面我们搭建了最简单的SpringCloud应用,使用了它的基本组件,每个组件都是单个服务的,这样的应用显然不具备高可用性,同时分为多个组件增加了系统复杂性,为了构建高可用的分布式应用,我们之后需要部署为集群方式。
Spring Cloud 分布式集群
接上一部分 https://www.zlennon.com/website/springcloud/index#spring-cloud-start-tutorial
1.Eureka集群
我们把服务都注册到Eureka中了,但是如果注册中心挂了,那就是相当于什么都挂了,所以注册中心需要配置为集群方式以保证高可用性。
因为集群需要不同的的域名,所以这里先修改hosts 映射(C:\Windows\System32\drivers\etc\hosts)
127.0.0.1 eureka1.com
127.0.0.1 eureka2.com
127.0.0.1 eureka3.com
复制两份server-registry 命名为server-registry2,server-registry 3 ,同时修改端口
server-registry 9001,server-registry2 9011 server-registry2 9021
每个服务配置其他两个eureka地址,使他们之间相互感知 ,启动三个服务即可。
server:
  port: 9001
eureka:
  instance:
    hostname: eureka1.com
  client:
    register-with-eureka: false
    fetch-registry: false
    service-url:
      defaultZone: http://eureka2.com:9011/eureka/,http://eureka3.com:9021/eureka
访问9001服务,查看集群是否配置成功

2.服务集群
将之前的服务提供者再拷贝一份 并命名为covid-provier2
这样两个服务分别使covid-provier 8080 ,covid-provier2 8090
.png)
配置集群服务,注意 spring.application.name 两个服务是相同的,表明提供的是同一个服务,instance-id 不同表示在eureka中的两个不同的服务实例
#server 8080
spring:
  application:
    name: ms-covid-provider

eureka:
  client: #客户端注册进eureka服务列表内
    service-url:
      defaultZone: http://eureka1.com:9001/eureka,http://eureka2.com:9011/eureka,http://eureka3.com:9021/eureka
  instance:
    instance-id: ms-cloud-covid-8080
    prefer-ip-address: true     #访问路径可以显示IP地址

---
#server 8090
spring:
  application:
    name: ms-covid-provider

eureka:
  client: #客户端注册进eureka服务列表内
    service-url:
      defaultZone: http://eureka1.com:9001/eureka,http://eureka2.com:9011/eureka,http://eureka3.com:9021/eureka
  instance:
    instance-id: ms-cloud-covid-8090
    prefer-ip-address: true     #访问路径可以显示IP地址
启动消费者访问,根据后台打印的日志可以看出,eureka默认使用轮询的方式提供服务。
spring-cloud-sentinel
1. sentinel用来干什么
Sentinel 是一款由阿里巴巴开源的流量控制和熔断框架,用于保护分布式系统中的服务免受异常流量、故障和过载的影响。它可以用于在微服务架构中保障服务的稳定性和可用性。
Sentinel 主要用途包括:
-
流量控制: Sentinel 可以限制进入某个服务的请求流量,防止过多的请求导致服务过载。它支持基于 QPS(每秒查询率)的流量控制和线程数控制,以确保服务能够稳定地处理请求。
-
熔断降级: 当服务出现故障或异常情况时,Sentinel 可以根据预设的规则触发熔断,暂时停止对服务的请求,以免影响整体系统的稳定性。一旦服务恢复正常,熔断状态会自动解除。
-
系统负载保护: Sentinel 可以根据系统的负载情况动态地进行流量控制和熔断。当系统负载过高时,可以防止新的请求进入,以避免进一步加剧系统负载。
-
实时监控和统计: Sentinel 提供实时的监控和统计数据,帮助开发人员了解服务的运行状态、异常情况以及流量情况。通过可视化的监控界面,可以及时发现和解决问题。
-
规则配置: Sentinel 允许开发人员配置流量控制和熔断的规则,以适应不同的应用场景。这些规则可以根据请求路径、资源名、调用关系等进行配置。
2.在spirngboot应用使用sentinel,并监控请求
控制台 · alibaba/Sentinel Wiki · GitHub 官方说明
introduction | Sentinel (sentinelguard.io)
代码中配置流控规则
@Configuration
public class SentinelAspectConfiguration {

    public static final String RESOURCE_NAME = "greeting"; // 定义资源名,用于标识要保护的服务或资源

    @Bean
    public SentinelResourceAspect sentinelResourceAspect() {
        return new SentinelResourceAspect(); // 创建 SentinelResourceAspect 实例,用于定义 Sentinel 切面
    }

    @PostConstruct
    public void init() {
        initFlowRules(); // 初始化流量控制规则
        initDegradeRules(); // 初始化熔断降级规则
        initSystemProtectionRules(); // 初始化系统保护规则
    }

    private void initFlowRules() {
        List<FlowRule> flowRules = new ArrayList<>();
        FlowRule flowRule = new FlowRule();
        flowRule.setResource(RESOURCE_NAME); // 设置规则对应的资源名
        flowRule.setGrade(RuleConstant.FLOW_GRADE_QPS); // 设置流量控制模式为 QPS(每秒查询率)
        flowRule.setCount(1); // 设置允许的 QPS 数量
        flowRules.add(flowRule);
        FlowRuleManager.loadRules(flowRules); // 将定义的流量控制规则加载到 FlowRuleManager 中
    }

    private void initDegradeRules() {
        List<DegradeRule> rules = new ArrayList<DegradeRule>();
        DegradeRule rule = new DegradeRule();
        rule.setResource(RESOURCE_NAME); // 设置规则对应的资源名
        rule.setCount(10); // 设置触发熔断的阈值
        rule.setTimeWindow(10); // 设置时间窗口,表示在多长时间内计算触发次数
        rules.add(rule);
        DegradeRuleManager.loadRules(rules); // 将定义的熔断降级规则加载到 DegradeRuleManager 中
    }

    private void initSystemProtectionRules() {
        List<SystemRule> rules = new ArrayList<>();
        SystemRule rule = new SystemRule();
        rule.setHighestSystemLoad(10); // 设置最高系统负载阈值
        rules.add(rule);
        SystemRuleManager.loadRules(rules); // 将定义的系统保护规则加载到 SystemRuleManager 中
    }
}
限流的使用
@Service
public class GreetingService {

    @SentinelResource(value = "greeting", fallback = "getGreetingFallback")
    public String getGreeting() {
        return "Hello World!";
    }

    public String getGreetingFallback(Throwable e) {
        e.printStackTrace();
        return "Bye world!";
    }

}
spring-cloud-sleuth
1. spring cloud sleuth 是什么
2. 代码实现
只需要引入依赖就可以实现分布式跟踪
//pom 依赖

  <dependency>
            <groupId>org.springframework.cloud</groupId>
            <artifactId>spring-cloud-starter-sleuth</artifactId>
            <version>3.1.8</version>
  </dependency>
3.工作原理
spring-cloud-gateway
1.Spring Cloud Gateway 是什么
Spring Cloud Gateway是 Spring Cloud 的一个全新项目,该项目是基于
Spring 5.0. Spring Boot 2.0 和Project Reactor 等技术开发的网关,它旨在为微服务架构提供一种简单有效统一的 AP! 路由管理方式;
为了提升网关的性能,
Spring Cloud Gateway 底层使用了高性能的通信框架Netty;
Spring Cloud Gateway 的目标,不仅提供统一的路由方式,并且基于 Filter 链的方式提供了网关基本的功能,例如:安全,监控/指标,和限流。
2.名字解释
- 路由(Route):任何一个来自于客户端的请求都会经过路由,然后到对应的微服务中。每个路由会有一个唯一的 1口 和对应的目的 URL。同时包含若干个断言和过滤器。
- 断言 (Predicate):当客户端通过 Http Request 请求进入 Spring Cloud Gateway 的时候,断言会根据配置的路由规则対 Htto Request 清求迸行断言匹配。
- 过滤器( Filter:简单来说就是对流经的请求进行过滤,,或者说对其进行获取以及修改的操作。注意过滤器的功能是双向的,也就是对请求和响应都会进行修改处

3.gateway的工作原理
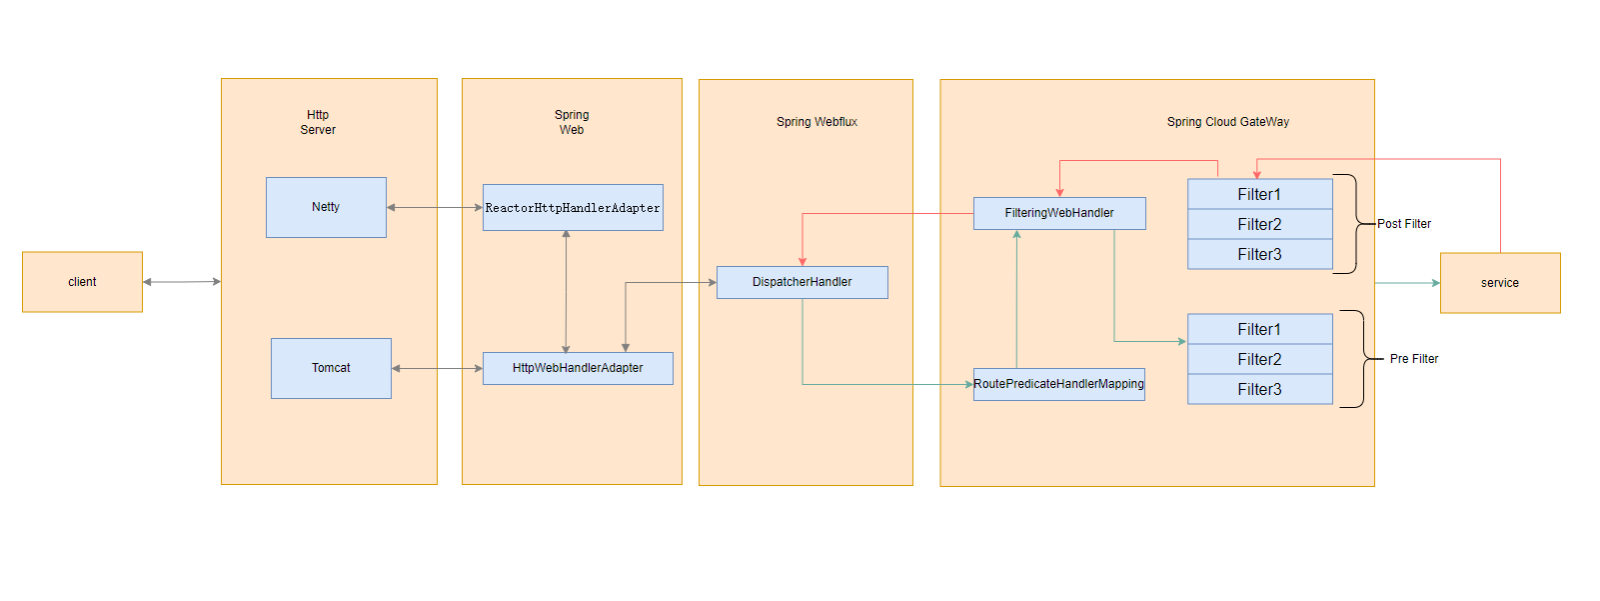
客户端发送请求到 Spring Cloud Gateway。如果网关处理映射(Gateway Handler Mapping)确定请求匹配了一个路由(route),则将请求发送到网关 Web 处理程序(Gateway Web Handler)。该处理程序将请求通过一个与请求相关的过滤器链处理。过滤器之所以被分成前后两部分,是因为它们可以在代理请求发送前后运行逻辑。首先执行所有的“pre”过滤器逻辑,然后进行代理请求。代理请求发送后,将运行“post”过滤器逻辑。

已Tomcat 为例,请求到达时会调用 HttpWebHandlerAdapter的handle方法,之后在DispatcherHandler的hander方法通过handlerMappings找到对应处理器,RoutePredicateHandlerMapping会找到对应的处理器FilteringWebHandler,即包含所有配置的过滤器的处理器,然后请求经过一系列的过滤器。
4.路由配置
yml配置文件中配置路由
下面的路由定义中,如果方法以test开头则会路由到https://www.zlennon.com,访问以chatgpt开头则会路由到chatgpt-model-service 服务,访问whitelist则会路由到指定的地址,并且先经过特定的filter whitelistFilter
spring:
  cloud:
    gateway:
      discovery:
        locator:
          enabled: true
      routes:
      - id: path_route
        uri: https://www.zlennon.com
        predicates:
        - Path=/test/*
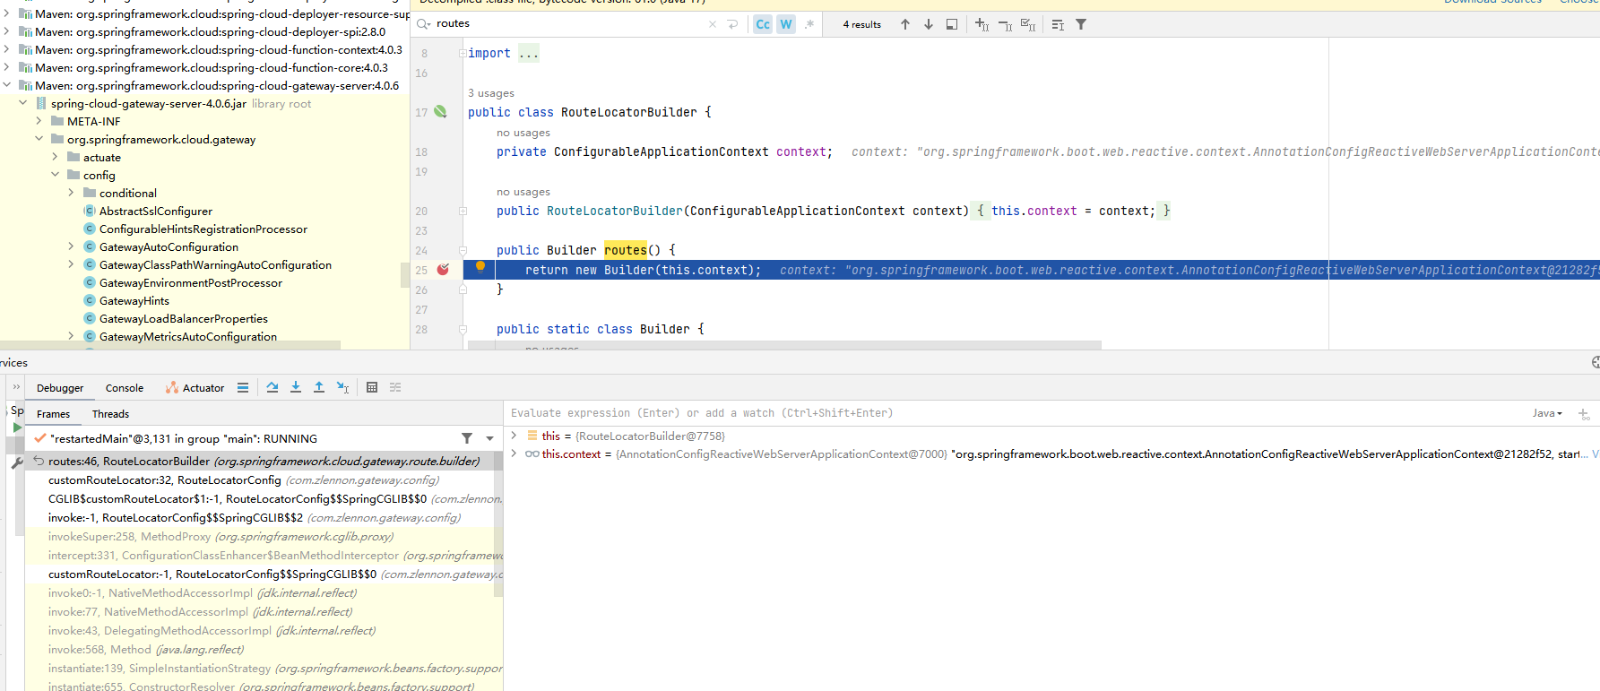
RouteLocatorBuilder 构建路由
    @Bean
    public RouteLocator customRouteLocator(RouteLocatorBuilder builder) {
        return builder.routes()
                .route("path_route", r -> r.path("/test/*")
                        .uri("http://127.0.0.1:5006/okhttp/asyncGetRequest"))

                .route("demoi18n", r -> r.path("/demoi18n/**")
                        //.uri("lb://chatgpt-model-service"))
                        .uri("http://127.0.0.1:7888"))
                .route("whitelist_route", r -> r
                        .path("/whitelist")
                        .filters(f -> f.filter(whitelistFilter))
                        .uri("http://whitelist.com"))
                .build();
    }
4.1动态路由
动态路由是针对静态路由而说的,一般我们通过java代码或配置文件设置的路由规则服务启动后就不能变了,除非修改后重启服务。
4.1.1 consul动态路由
配置监听配置中心路由变化,通过watch属性可监听配置改变
spring:
  cloud:
    consul:
      enabled: true
      host: localhost
      port: 8500
      discovery:
        enabled: true
        register: true
        heartbeat:
          enabled: true
        instance-id: ${spring.application.name}-${server.port}
        health-check-path: /actuator/health
        health-check-interval: 10s
        prefer-ip-address: true
      config:
        enabled: true #开启配置中心,默认是true
        default-context: gateway #应用文件夹,默认值 application
        profile-separator: ',' # 环境分隔符,默认值 ","
        format: yaml #配置格式,默认 key-value,其他可选:yaml/files/properties
        data-key: route #配置 key 值,value 对应整个配置文件
        #以上配置后,我们的配置文件在consul中的完整的key为 springcloud/application,dev/route
        prefixes: springcloud
        watch:
          enabled: true #启用配置自动刷新
          delay: 1000 # 刷新频率,单位:毫秒
          wait-time: 100
4.1.2 nacos 动态路由
通过RouteDefinitionWriter更新删除路由定义
package com.zlennon.gateway.dynamic;

import lombok.extern.slf4j.Slf4j;
import org.springframework.cloud.gateway.event.RefreshRoutesEvent;
import org.springframework.cloud.gateway.route.RouteDefinition;
import org.springframework.cloud.gateway.route.RouteDefinitionWriter;
import org.springframework.context.ApplicationEventPublisher;
import org.springframework.context.ApplicationEventPublisherAware;
import org.springframework.stereotype.Service;
import reactor.core.publisher.Mono;

import java.util.List;

/**
 */
@Service
@Slf4j
public class DynamicRouteService implements ApplicationEventPublisherAware {

	private final RouteDefinitionWriter routeDefinitionWriter;

	private ApplicationEventPublisher publisher;

	public DynamicRouteService(RouteDefinitionWriter routeDefinitionWriter) {
		this.routeDefinitionWriter = routeDefinitionWriter;
	}

	@Override
	public void setApplicationEventPublisher(ApplicationEventPublisher applicationEventPublisher) {
		this.publisher = applicationEventPublisher;
	}


	public String addList(List<RouteDefinition> routeDefinitions) {
		routeDefinitions.forEach(this::save);
		return "add done";
	}

	/**
	 * 增加路由
	 */
	public String save(RouteDefinition definition) {
		try {
			routeDefinitionWriter.save(Mono.just(definition)).subscribe();
			this.publisher.publishEvent(new RefreshRoutesEvent(this));
			return "save success";
		} catch (Exception e) {
			e.printStackTrace();
			return "save failure";
		}
	}

	/**
	 * 更新路由
	 */
	public String update(RouteDefinition definition) {
		try {
			this.routeDefinitionWriter.delete(Mono.just(definition.getId()));
			this.routeDefinitionWriter.save(Mono.just(definition)).subscribe();
			this.publisher.publishEvent(new RefreshRoutesEvent(this));
			log.info("Loaded Route: {}", definition.getId());
			return "update success";
		} catch (Exception e) {
			e.printStackTrace();
			return "update failure";
		}
	}

	/**
	 * 更新路由
	 */
	public String updateList(List<RouteDefinition> routeDefinitions) {
		routeDefinitions.forEach(this::update);
		return "update done";
	}

	/**
	 * 删除路由
	 */
	public String delete(String id) {
		try {
			this.routeDefinitionWriter.delete(Mono.just(id));
			return "delete success";
		} catch (Exception e) {
			e.printStackTrace();
			return "delete failure";
		}
	}


}
监听配置文件变更
package com.zlennon.gateway.dynamic;

import cn.hutool.core.text.CharSequenceUtil;
import com.alibaba.cloud.nacos.NacosDiscoveryProperties;
import com.alibaba.fastjson2.JSON;
import com.alibaba.nacos.api.NacosFactory;
import com.alibaba.nacos.api.PropertyKeyConst;
import com.alibaba.nacos.api.config.ConfigService;
import com.alibaba.nacos.api.config.listener.Listener;
import com.alibaba.nacos.api.exception.NacosException;
import jakarta.annotation.PostConstruct;
import jakarta.annotation.Resource;
import lombok.extern.slf4j.Slf4j;
import org.springframework.beans.factory.annotation.Autowired;
import org.springframework.boot.context.properties.EnableConfigurationProperties;
import org.springframework.cloud.context.config.annotation.RefreshScope;
import org.springframework.cloud.gateway.route.RouteDefinition;
import org.springframework.core.annotation.Order;
import org.springframework.stereotype.Component;

import java.util.List;
import java.util.Properties;
import java.util.concurrent.Executor;

@Order
@Component
@Slf4j
@RefreshScope
public class DynamicRouteServiceListener {

    @Autowired
    private DynamicRouteService dynamicRouteService;


    @PostConstruct
    public void init() {
        try {
            Properties properties = new Properties();
            properties.put(PropertyKeyConst.SERVER_ADDR, "localhost:8848");
            properties.put(PropertyKeyConst.NAMESPACE, "nacos-routes");
            ConfigService configService = NacosFactory.createConfigService(properties);
            String dataId = "gateway-nacos-routes.json";
            String group = "nacos-routes";
            log.info("gateway init,dataId:{},group:{}", dataId, group);
            configService.addListener(dataId, group, new Listener() {
                @Override
                public void receiveConfigInfo(String configInfo) {
                    nachosListener(configInfo);
                }

                @Override
                public Executor getExecutor() {
                    return null;
                }
            });
            String configInfo = configService.getConfig(dataId, group, 5000);
            if (CharSequenceUtil.isNotBlank(configInfo)) {
                log.info("recevie config info:\r\n{}", configInfo);
                List<RouteDefinition> routeDefinitions = JSON.parseArray(configInfo, RouteDefinition.class);
                dynamicRouteService.addList(routeDefinitions);
                log.info("init finished");
            }
        } catch (NacosException nacosException) {
            log.error("init error!", nacosException);
        }
    }

    private void nachosListener(String configInfo) {
        if (CharSequenceUtil.isNotBlank(configInfo)) {
            try {
                log.info("gateway update config:\r\n{}", configInfo);
                List<RouteDefinition> routeDefinitions = JSON.parseArray(configInfo, RouteDefinition.class);
                dynamicRouteService.updateList(routeDefinitions);
            } catch (Exception e) {
                log.error("parse error", e);
            }
        } else {
            log.warn("no config info");
        }
    }


}
5. gateway初始化
springboot 初始化见 springboot-init
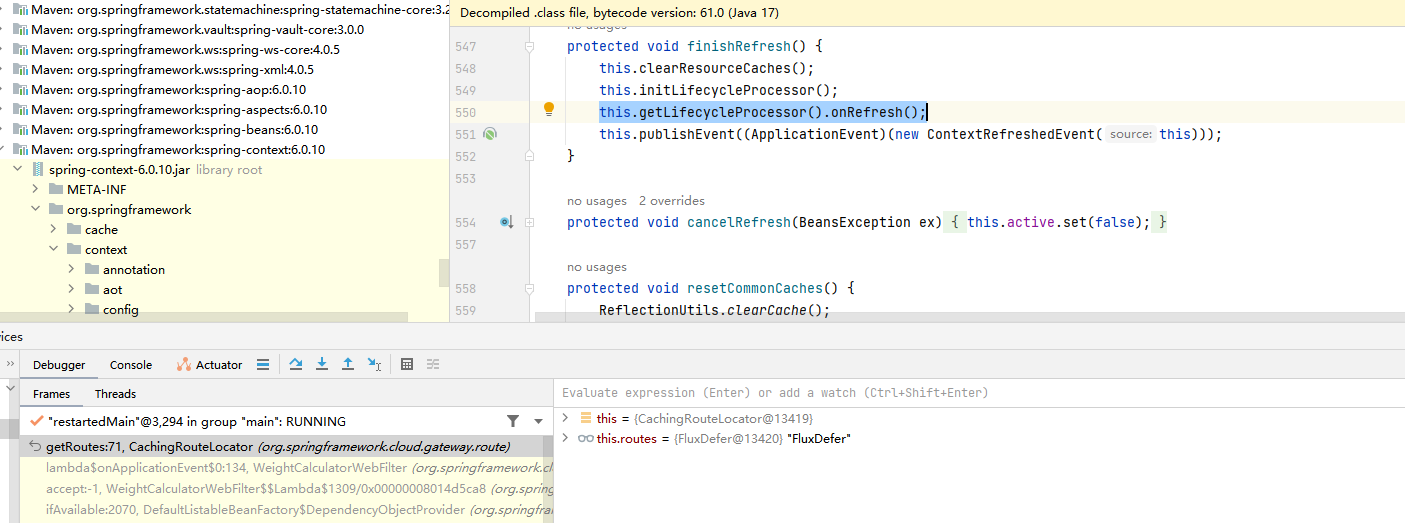
springboot finishBeanFactoryInitialization 创建bean时 加载GatewayAutoConfiguration 中创建对应的RouteDefinitionRouteLocator。
finishRefresh 后发送事件 调用RouteRefreshListener的onApplicationEvent方法,进而调用CachingRouteLocator.onApplicationEvent ,将路由信息放入map this.cache.put("routes", signals);

GatewayAutoConfiguration
GatewayAutoConfiguration是gateway自动配置的关键类,几个注解如下:
@Configuration(
    proxyBeanMethods = false
)
@ConditionalOnProperty(
    name = {"spring.cloud.gateway.enabled"},
    matchIfMissing = true
)
@EnableConfigurationProperties
@AutoConfigureBefore({HttpHandlerAutoConfiguration.class, WebFluxAutoConfiguration.class})//WebFlux相关的配置,before表是先于GatewayAutoConfiguration配置
@AutoConfigureAfter({GatewayReactiveLoadBalancerClientAutoConfiguration.class, GatewayClassPathWarningAutoConfiguration.class})//在负载均衡的自动配置之后配置
@ConditionalOnClass({DispatcherHandler.class})// 类路径下必须有DispatcherHandler,即需要引入spring webflux依赖
WebFluxAutoConfiguration中会配置相应的react类型的web服务Tomcat,Jetty,Undertow和Netty
GatewayClassPathWarningAutoConfiguration主要用来验证是否依赖了webflux
完了之后就根据@Bean 实例化对应的类GatewayProperties,RouteDefinitionLocator,GlobalFilter等
spring cloud 负载均衡
Spring Cloud LoadBalancer是Spring Cloud官方自己提供的客户端负载均衡器,用来替代Netflix Ribbon。它是一个客户端层的负载均衡器,用于发现、更新和维护服务列表,并自定义服务的均衡负载策略,如随机、轮询、小流量的金丝雀等等。Spring Cloud LoadBalancer提供了自己的客户端负载平衡器抽象和实现,增加了ReactiveLoadBalancer接口,并提供了基于round-robin轮询和Random随机的实现。
官方文档:spring-cloud-loadbalancer
Demo实现
创建客户端应用,并设置服务端口7900,并创建一个rest接口用于调用服务
@RestController
@Slf4j
@RequestMapping("/hello")
public class HelloController {
    @Autowired
    WebClient.Builder webClientBuilder;

    @Autowired
    RestTemplate restTemplate;

    @GetMapping ("/webclient")
    public ResponseEntity webclient(HttpServletRequest request) {
        WebClient loadBalancedClient = webClientBuilder.build();
        List<String> resp = new ArrayList<>();
        for(int i = 1; i <= 10; i++) {
            String response =
                    loadBalancedClient.get().uri("http://instance-server/hello")
                            .attribute("sessionId",request.getParameter("sessionId"))
                            .retrieve().toEntity(String.class)
                            .block().getBody();
            resp.add(response);
        }

        return new ResponseEntity<>(resp,HttpStatusCode.valueOf(200));
    }

    @GetMapping ("/rest")
    public ResponseEntity rest(HttpServletRequest request) {
        WebClient loadBalancedClient = webClientBuilder.build();
        List<String> resp = new ArrayList<>();
        for(int i = 1; i <= 10; i++) {
            String response = restTemplate.getForObject("http://instance-server/hello", String.class);
            resp.add(response);
        }

        return new ResponseEntity<>(resp,HttpStatusCode.valueOf(200));
    }
}
依赖引入
        <dependency>
            <groupId>org.springframework.cloud</groupId>
            <artifactId>spring-cloud-starter-loadbalancer</artifactId>
        </dependency>

        <dependency>
            <groupId>org.springframework.boot</groupId>
            <artifactId>spring-boot-starter-webflux</artifactId>
        </dependency>
ServiceInstanceListSupplier 实现,构建服务实列列表
class DemoInstanceSupplier implements ServiceInstanceListSupplier {
    private final String serviceId;

    public DemoInstanceSupplier(String serviceId) {
        this.serviceId = serviceId;
    }

    @Override
    public String getServiceId() {
        return serviceId;
    }

    @Override
    public Flux<List<ServiceInstance>> get() {
        return Flux.just(Arrays
                .asList(new DefaultServiceInstance(serviceId + "7901", serviceId, "localhost", 7901, false),
                        new DefaultServiceInstance(serviceId + "7902", serviceId, "localhost", 7902, false)));
    }
}
//---------------------------------------------

@Configuration
public class DemoServerInstanceConfiguration {
    @Bean
    ServiceInstanceListSupplier serviceInstanceListSupplier() {
        return new DemoInstanceSupplier("instance-server");
    }
}
从nacos上获取服务实例
class NacosInstanceSupplier implements ServiceInstanceListSupplier {
    private final String serviceId;
    private final DiscoveryClient discoveryClient;

    public NacosInstanceSupplier(String serviceId, DiscoveryClient discoveryClient) {
        this.serviceId = serviceId;
        this.discoveryClient = discoveryClient;
    }

    @Override
    public String getServiceId() {
        return serviceId;
    }

    @Override
    public Flux<List<ServiceInstance>> get() {

        List<ServiceInstance> serviceInstances = discoveryClient.getInstances(serviceId);
        return Flux.just(serviceInstances);
    }
}
负载均衡bean配置
@Configuration
@LoadBalancerClient(name = "instance-server", configuration = DemoServerInstanceConfiguration.class)
public class LoadBanlanceConfig {

        @LoadBalanced
        @Bean
        WebClient.Builder webClientBuilder() {
            return WebClient.builder();
        }

        @Bean
        @LoadBalanced
        public RestTemplate restTemplate() {
            return new RestTemplate();
        }

        @Bean
        public ReactorLoadBalancer<ServiceInstance> reactorServiceInstanceLoadBalancer(Environment environment,
                                                                                       LoadBalancerClientFactory loadBalancerClientFactory) {
            String name = "instance-server";
            return new ZBRoundRobinLoadBalancer(
                    loadBalancerClientFactory.getLazyProvider(name, ServiceInstanceListSupplier.class), name);
        }
}
这里使用自定义负载配置,其他默认配置类有如下类,包括nacos,随机负载均衡

ZBRoundRobinLoadBalancer 实现
这里如果请求中没有sessionId时,维护一个原子整数。相当于轮询。
如果有SessionId,sessionid相同的请求都会路由到同一个服务上。
 private Response<ServiceInstance> getInstanceResponse(List<ServiceInstance> instances, Request request) {
        if (instances.isEmpty()) {
            if (log.isWarnEnabled()) {
                log.warn("No servers available for service: " + this.serviceId);
            }
            return new EmptyResponse();
        } else {
            DefaultRequestContext requestContext = (DefaultRequestContext) request.getContext();
            RequestData clientRequest = (RequestData) requestContext.getClientRequest();
            String sessionId = (String) clientRequest.getAttributes().get("sessionId");
            ServiceInstance instance = null;
            if (sessionId == null) {
                int pos = this.position.incrementAndGet() & 2147483647;
                instance = instances.get(pos % instances.size());
                return new DefaultResponse(instance);
            } else {
                if (instanceSession.get(sessionId) != null) {
                    instance = instances.stream().filter(f -> f.getInstanceId().equals(instanceSession.get(sessionId))).findFirst().get();
                } else {
                    instance= instances.get(this.position.incrementAndGet()%instances.size());
                    instanceSession.put(sessionId, instance.getInstanceId());

                }
            }
            return new DefaultResponse(instance);
        }
    }
创建并启动springboot服务instance-server-one 和instance-server-two 端口分别为7901和7902
提供一个基本rest接口,表明该服务被调用
@RestController
@Slf4j
public class HelloController {
    @Value("${server.port}")
    String port;

    @Autowired
    WebClient.Builder webClientBuilder;

    @RequestMapping("/hello")
    public String hello(HttpServletRequest request)
    {
        return "response from instance-server:"+port;
    }
}
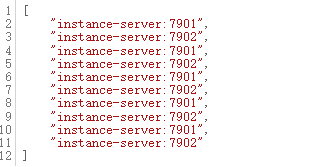
访问localhost:7900/hello/webclient ,会进行轮询路由不同的实例
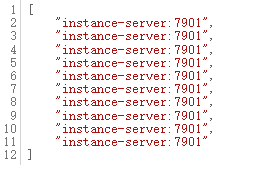
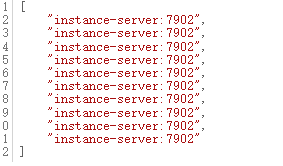
如果代sessionId 则相同的sessionId请求都会路由到同一个服务实列, 如访问 localhost:7900/hello/webclient?sessionId=aa 会全部负载到7901,localhost:7900/hello/webclient?sessionId=bb会负载到7902
原理分析
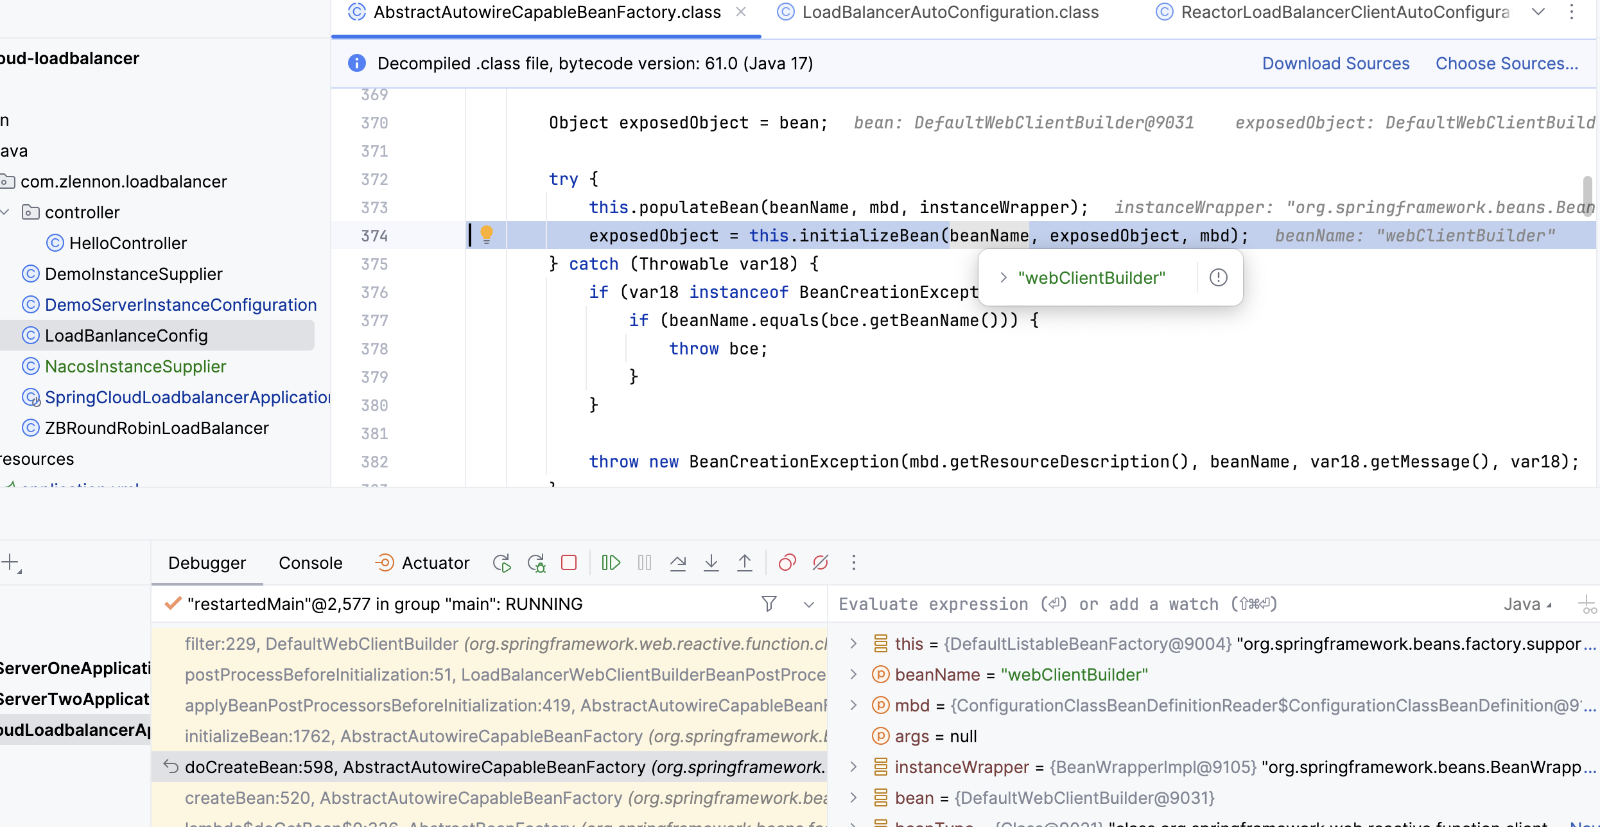
DefaultWebClientBuilder
ReactorLoadBalancerClientAutoConfiguration
ReactorLoadBalancerExchangeFilterFunction
LoadBalancerWebClientBuilderBeanPostProcessor
